 |
Basic working assumptions
- Traxx is loaded on your pc
- All the Art is extracted
from at least one track
- You know how to load textures
into your track and try them out
Notes on RAW and ACT files
If you look in your Art directory, you will see tons of files ending
in .RAW. These are the texture files. The Raw format is a flexible file
format for transferring files between applications and computer platforms.
You will also see companion files with the same names but a different file
type, .ACT, these are the palette files, one for each texture. Think of
this arrangement like a Paint-by-Number where your filename.RAW (picture)
is just a black and white unpainted canvas with the numbers filled in,
and the filename.ACT (palette) is your painter’s palette holding all the
colors with the corresponding numbers. MTM2 must have both the RAW and
ACT files to work properly.
| MTM1 works a little differently. In MTM1, almost all the textures use a single palette file, Metalcr2.act, so if you are working with MTM1 textures, you need to substitute that palette file name in the instructions below. |
NOTE: Just to add some extra confusion, Photoshop refers to all of its different little tool boxes that pop up on the work area as Palettes too, like the Action Palette, the Paint Brush Palette, etc.. Try not to confuse these two different uses of the word ‘Palette’ when you are using Photoshop Help or when you are reading these instructions.
For basic terrain textures, there are four things you'll want to know:
Load/Open an existing texture into Photoshop.
Edit a texture.
Create a brand new tiling texture.
Save your new texture so Traxx can load it.
Load/Open an existing texture into Photoshop
When you load a texture and its palette in Indexed Color Mode, you have
the exact colors that are used in the game. To do much editing, you need
to convert to RGB mode (16 million colors), then back to Indexed Color
( 256 colors) later to save it.
| 1. | From the menu, select File > Open. Now find your Art folder in Traxx where your .RAW and .ACT files are. | |
| 2. | Pick out the 64x64 .RAW file you want to edit. MTM2 terrain textures must be 64x64. When you select a file and say Open, you will get the RAW Options dialog box. If you picked a good example, the first two fields will be the Dimensions and should say Width 64 pixels, Height 64 pixels. If that’s right just click OK, if not push Cancel and select the right 64x64 texture. | |
|
||
| 3. | You should then get a little black and white picture displayed. This is your unpainted canvas. Now you must tell Photoshop what palette to use to paint it. | |
| 4. | From the menu, select Image > Mode submenu. You will see a check by Grayscale, change the Mode to Indexed Color by clicking on it. | |
| 5. | Now to get the palette. Select Image > Mode, (you should see a check by Indexed Color now) and all the way at the bottom of the Mode Submenu select Color Table. The Color Table dialog box will pop up with Grayscale selected as the current Table. | |
| 6. | Press the Load button and the Load dialog box pops up. In the Look In box, find your Art folder and select thenameofthefileyou picked.ACT and then press Open. The Load Dialog box goes away and the Color Table is now filled with colors. The texture file you loaded will turn into something that is hopefully recognizable. In the Color Table dialog box, select OK, and it will disappear for now. | |
| 7. | You now have the texture loaded. You can do limited editing in this mode with the existing palette if you feel you need to maintain the original colors. Filters don’t work in this mode, but you can cut, paste, and paint. | |
| 8. | To be able to work with the texture any more than that, you need to get out of the Indexed Color mode. Go back to the Image, Mode submenu and select RGB Color. Most of the work you probably want to do will be done in this mode. |
| A good shortcut to open an existing texture in
Photoshop, is to have Traxx up and running and copy a texture from there
directly. One big advantage to using Traxx is you get to see the image
you are going to work with before it pops up in Photoshop. This does, however,
convert the image directly to RGB mode, so if for some reason you need
to stay in Indexed Color Mode, and maintain the original Palette colors,
stick with the manual instructions above. Otherwise:
1. In Traxx, open the Textures box and load the textures you want to use. 2. Select the Texture you want to work with, then press the Copy button. 3. In Photoshop, from the menu select Edit then Paste (Ctrl+V for short). Now you have your texture loaded in RGB color mode and you are ready to Edit. |
One reason you might want to modify a texture will probably be to smooth out places where two different textures meet, like where you have made an unusual intersection of a dirt road and an asphalt road and the normal pieces just don’t seem to want to fit quite right. With all your other textures in place, there may be just a few spots that need tweaking. When you paste part of one texture into another one, it is added in a separate layer. You can see the current layer in the Layers Palette. When you are cutting and pasting pieces together, having separate layers is convenient, but when you are ready to draw or apply filters, you need to flatten the image first to combine all those layers.
Now you’re ready to do some editing. Time to jump into an example. In
this example, you need to use a few tools that are sitting in your toolbox.
|
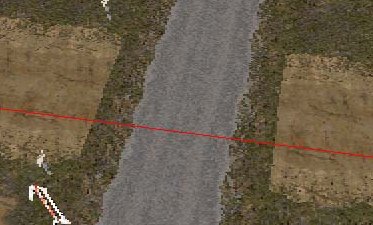
| 1. | The intersection doesn't look quite finished, I couldn't find the texture I needed to tie together the 3 different road, asphalt, and grass textures. |
 |
|
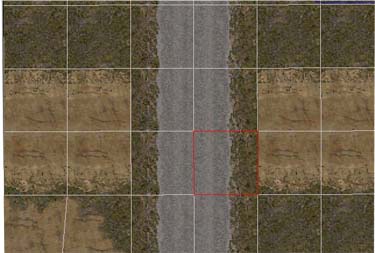
| Looking at the intersection with the grid applied, it's easy to see the textures that need tweaking. | |
 |
|
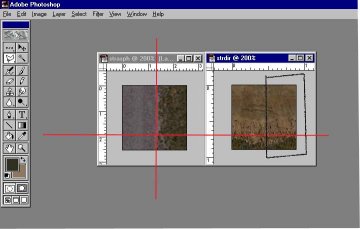
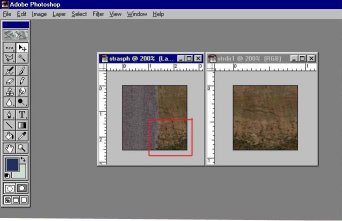
| 2. | Load the edge of your asphalt road, and the segment of dirt road into Photoshop and convert to RGB mode. (I make a duplicate of any texture I’m working on, then close the original without saving any changes so I know I won’t make any un-reversable mistakes, then do all editing on just the duplicate files. From the menu, select Image > Duplicate.) Resize the frames and zoom in a little to make them comfortable to work on. It's best to have the frames a little bigger than the images themselves, if you run over a little while cutting and pasting, the excess is just clipped off. |
 |
|
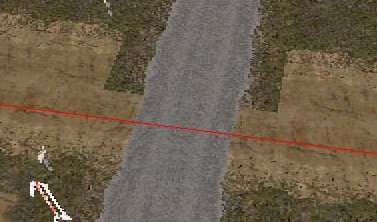
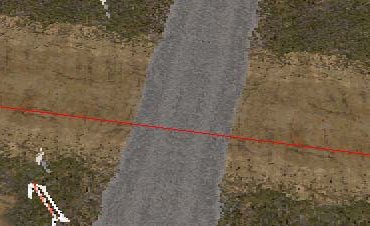
| 3. | When you combine the two textures, you want to maintain the grass edge alignments of both the original textures so you can reuse your new texture in other places where these roads meet. The red lines show the edges you want to maintain. |
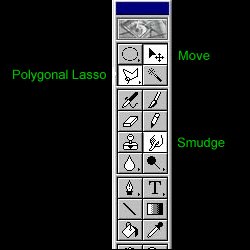
| 4. | To select the area you want to copy, use your polygonal lasso tool (the lasso with the straight edges) to select the black boxed area. Its ok to go outside the picture, the tool will only grab the image itself. |
| 5. | After selecting with the lasso, you will see a blinking line where your selection is, if you screw up the selection, just start over with lasso. |
| 6. | When you have about half the image selected, from the menu select Image > Copy (Ctrl+C). |
| 7. | Next select the other image. From the menu select Image > Paste (Ctrl+V). |
| 8. | A floating image of the dirt road then appears in the asphalt road image. The floating image is contained in a new, separate layer. Select the Move Tool (the little arrow in the top right of the tool box) and slide the floating dirt road image into place, maintaing the edges of both images. |
 |
|
| 9. | The area in the red box is the most critical alignment area. Can you see how there is grass all in that corner? This way you know an asphalt/grass, dirt/grass, or just plain grass texture can fit up against there ok. Next, to flatten the texture, from the menu, select Layer > Flatten Image. Then use the Smudge tool (the pointing finger in the tool box) to kind of soften the lines between the textures you've pasted. |
| 10. | This single new texture can be mirrored and turned to fill in the gaps in all four places. |
 |
|
 |
|
| 11. | In more general terms, anytime you are making two or more textures meet, you want to work it out so the smudgy lines between them meet at about half way along the edge of the texture image, that way when you lay different textures beside each other that smudgy line meets up with the other smudgy lines. The most basic thing is to split the texture in half then smudging the line between dirt and grass. Or you might need to make some diagonal tiles if your road runs off at a 45 degree angle. |
 |
|
| 12. | When you are done tweaking, you are ready to Save you new texture so you can try it out. |
I use an Action File to create tiling textures. It is freeware by Andre
Bode. The Action file is like a Macro, automating a lot of steps for you.
It is very easy to use and includes prompts and instructions as you are
running it. Click here to download Action File if
you do not already have it.
| 1. | Download the Tile Action file and unzip it anywhere. Your Photoshop directory would be good. |
| 2. | Find your Action Palette, its one of the floating tool boxes with one tab in it called Actions. If your Action Palette is not displayed, from the menu, select Window > Show Actions. |
| 3. | Load the Action File from the Action Palette menu. Just click on the little Right Arrow near the top of the Action Palette and a large Submenu opens up. From the Action Palette Submenu select Load Actions. The standard Windows Load dialog box pops up and you just need to find the tile.atn file you unzipped in step 1. |
| 4. | Then switch the Action Palette to Button mode from the same Action Palette Submenu if you aren’t there already. |
| 5. | You will see 18 new buttons in your Action Palette now, starting with Textured Tile-Instructions, and ending with Test Your Tile. |
| 6. | When you start making a tile with this Action, you can specify the background color you have selected in your Toolbox to be the base color. The two color swatches at the bottom of the Toolbox show the current selections. You can change them by clicking on them to call up the Color Picker Dialog box. |
| 7. | Press the instructions button and follow along. When you are prompted to enter the tile size, just pick 64 pixels by 64 pixels. The rest of the instructions are very thorough, with suggestions and tips to follow. Just play with it, some of the included filters are great. I was amazed at how easy it is to use. I have tried making tiling textures manually and I know I’ll never go back to that. |
| 8. | When you are done playing with the filters, press the Finish Textured Tile button. A Hue/Saturation box pops up, and suddenly your colors look screwy, don't panic. Uncheck the Colorize selection in the lower right and the correct colors are restored. If everything looks ok, then select OK. |
| 9. | Next select the last button, Test Your Tile. If you are happy with the Test results, you are ready to Save the new texture. |
Before you save a texture in Photoshop you have to convert the Image
- Mode to Indexed Color. When you convert it, photoshop also creates an
Indexed Palette to go along with the image. You have to save the Image
File as filename.RAW and also save the palette as filename.ACT, keeping
the filenames the same so that MTM2 knows which palette goes with what
texture picture. I save the .RAW file first and the .ACT file immediately
afterwards to make sure I keep them synchronized. You can have multiple
images open at once, each with its own palette, but when you go to save
the palette, it will be the one associated with the currently active image.
You can save the palette first, just make sure it’s the one for the right
image. If these two files get out of synch, your texture starts looking
like one of those false color pictures of a brain scan hehe.
| 1. | Before saving your new texture, you need to convert it to Indexed Mode. From the menu, select Image > Mode > Indexed Color. | |
| 2. | The Indexed Color dialog box pops up. If you’re still with me to here you should set the options in this box to Palette : Adaptive Color Depth: 8 bit/pixel Colors: 256 Dither: Diffusion. Then press OK. Sometimes if you’ve fiddled with the picture a lot in RGB mode, some of the colors change when you do this since you are reducing down to only 256. If something doesn’t look right, just go back to RGB mode and tweak it again, then change back to Indexed color. | |
| 3. | Now that you have the texture you want, you need to pick a new filename. You probably want to keep part of the old name so you can remember what the base texture was, and so it will show up close to the base texture in the Traxx alphabetical listing you see when loading textures. If it’s a brand new texture, starting with a couple of letters from the track name you are working on seems to help me remember what it is. | |
|
||
| 4. | Now you can save the file. Go to File > Save As, in the Save In: box, make sure your Traxx Art folder is selected, in the File Name box, enter the new name you picked and add the .RAW extension. (If you leave off the .RAW extension, Photoshop will add it the first time you try to save, then just hit Save again.) (Remember the filename because you’ll need it in the next step when you save the palette file.) | |
| 5. | When you click Save, you get the Raw Options dialog box. Leave everything the way it is and click OK. Then a Warning box from Photoshop comes up about losing image data with this format. Again, leave everything and click OK. | |
| 6. | Next you need to save the palette for the texture. From the menu select Image > Mode > Color Table. | |
| 7. | The Color Table pops up again, but now it only contains the colors you need for your custom texture. In the Color Table select the Save button. Now the Save dialog box pops up, prompting you for a file name. You must use the same filename here with the .ACT extension that you used in the previous step with the .RAW extension, and make sure the Save In: box is pointing to your Traxx Art folder. | |
| 8. | The texture and its palette should now be in the Traxx Art folder. | |
| 9. | Go to Traxx and see if you can load it and put it in you track. |
| Shortcut : Just as with loading textures into
Photoshop, Traxx will help you save textures in the appropriate RAW and
ACT file formats. First convert the image to 8 bit, indexed-color,
then copy and paste into Traxx.
1. From the menu, select Image / Mode /
Indexed Color.
For more information, please see here, or use the MTMG main menu to goto the Traxx help section. |